Showing posts with label crafts. Show all posts

Friday, August 3, 2018

Adventure Tag : Using Details to Create Cohesiveness

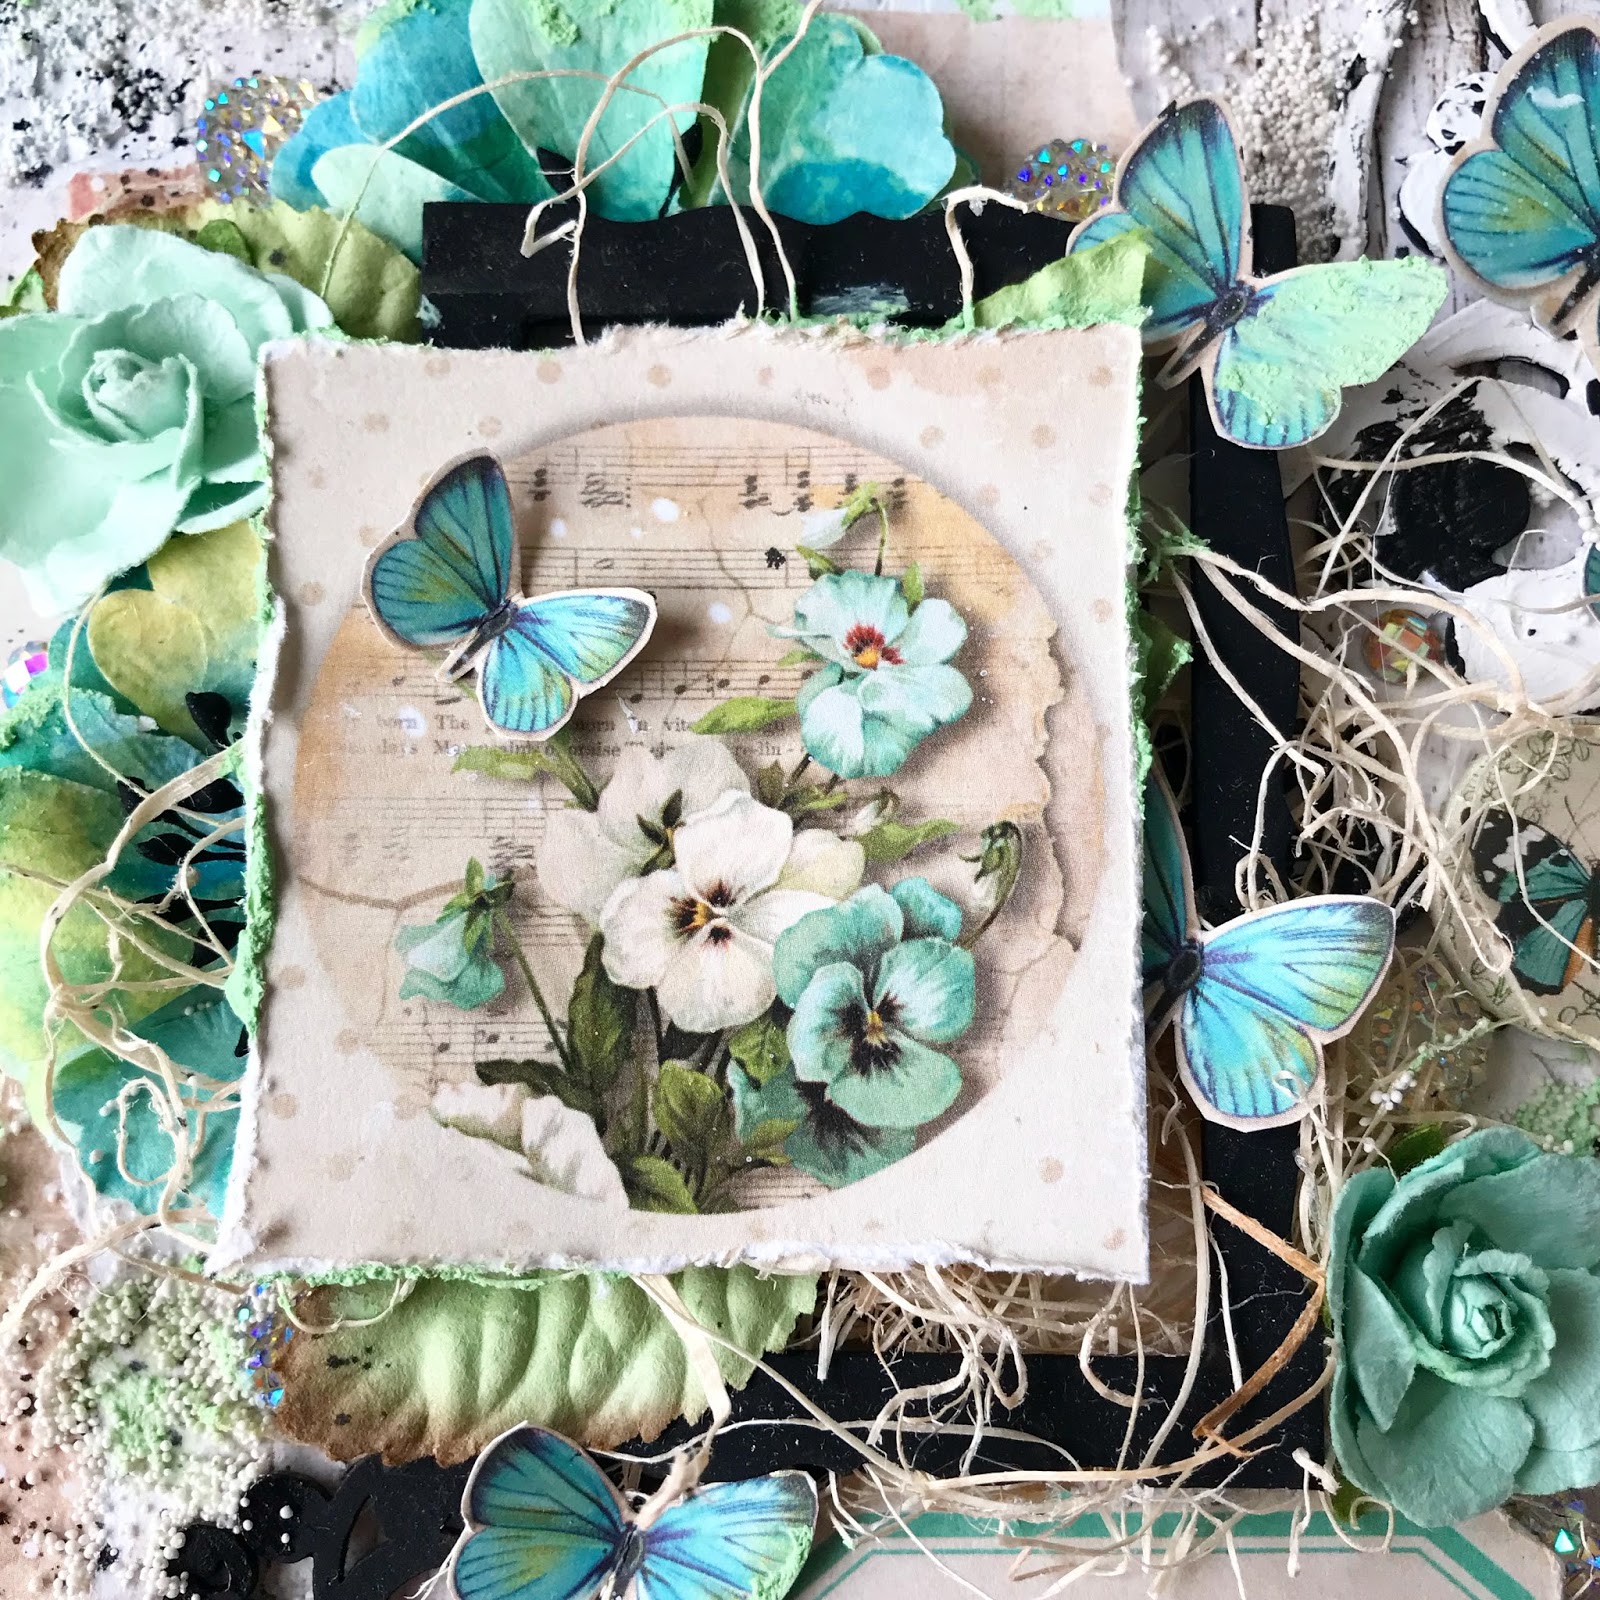
Tag made with Studio Light "Memories of Summer" Paper Collection Designed for Cherish the Memory


Using small paper details to create a connection

If you love detail, you'll appreciate the small intricate die cut pieces that come with the "Memories of Summer" Paper Collection by Studio Light available at Cherish the Memory
I will have the links to the paper collection listed below.

There are a total of three layers in this card : 1. The brown wooden background 2. The light creme colored paper background (Post Card layer) 3. The photo frame. 

Starting with the embellishments at the top, you will see that they are what is connecting the background with the "Post Card" layer...and there you have it! You have created what I call a "connection" between the first and second layer. That's all there is to it! Whenever you have layers, always make sure to connect the layers with related items to the items you are using for the rest of your card, tag or canvas.


Create Cohesiveness

To create cohesiveness, one must pay attention to not just connecting the layers, but to make sure to use related items. Related items are items that fit a theme, such as the butterflies I used or in this case all the travel accessory die cuts. What I like to always remember is figure out where you would like to guide the viewer's eye when creating a layout. For instance, if you'd like the visual flow of the card to flow from the top left to the bottom right you use details following the same path.

With this collection creating cohesiveness and connecting layers is really a no-brainer. This is why I enjoy working with this collection so much because it makes project making super easy! Please feel free to ask me any questions below in the comment section. I hope you enjoyed my short blog post! Please take a moment to visit the shop links below.


Thursday, July 19, 2018

Simple Travel Themed Masculine Card


Creating a simple yet eye pleasing Masculine Card using Studio Light Paper from Cherish the Memory


If you're anything like me, you're drawn to floral, feminine, colorful designs which can sometimes pose a challenge when making a card for a man, or for a female friend who isn't into "girly" designs as you are. The "Memories of Summer" collection that you can purchase at Cherish the Memory really takes the guesswork out of picking and choosing paper for your masculine card. What is so great about this collection is that it has a good balance in range, therefore really allowing you to make both masculine, gender neutral and feminine projects without having to buy several collections!


My favorite part of the collections by Studio Light are the paper pads, which I will be providing the link to below. I love the paper pads because it comes jam packed with backgrounds, but you see that you don't have to use the backgrounds just for backgrounds. If you look at the three rectangular paper pieces, they have been die cut from the paper backgrounds in the pad to create the layering effect where I used foam mounting tape.

What I love most about this card is the use of neutral warm earth tones. Stick with natural colors such as browns and tans to get down the color scheme for a masculine card. I knew as soon as I saw the lighthouse from the ephemera pack that I would be using it, it's so pretty! The vintage plane stamp was also a really cool feature in the ephemera pages which I will also link. 

Some tips that helped me put this card together :
1. Use earth tones such as browns, tans, grays, greens and blues
2. Take items from your stash that you have found yourself neglecting and throw things together to see if they complement the card. The background paper has a wooden grain texture which I had no plans for, until this card came up!
3. Jute adds a great natural element that is gender neutral. Texture in masculine cards is your friend.
4. Keep the design simple. I struggle with simple design but simple and clean is a must to achieve that perfect look. Masculine details can be pretty powerful, and you want them to speak for themselves and not overwhelm the card or viewer.
5. It helps to choose a 5x7 layout for a masculine card, the linear layout helps create a stronger card.

I hope you found some inspiration and ideas! Check out the Cherish the Memory shop for the collection:  


Friday, May 4, 2018

"Collect Beautiful" Moments Beginner's Card Tutorial for Cherish the Memory

Simple and Easy Card using LemonCraft Papers
available at Cherish the Memory 


Hello! Welcome to my blog! Today I am sharing with you how to make this pretty, yet fast card I made with these romantic vintage papers by LemonCraft. You can make this card in less than 20 minutes. (Links to Cherish the Memory listing to purchase)

Materials:

White Cardstock
Scoreboard
Paper Trimmer
2 Paper Doilies
Scissors
Nuvo Crystal Drop Bubblegum Blush (suggested)
Tim Holtz Idea-ology Stickers 
LemonCraft Gossamuer Blue Pad
Mini Tag + Twine 
Foam Tape
Double Sided Adhesive
Optional : small oval craft dies (I used SpellBinders)


Instructions 

  1. Take white cardstock, trim and fold to make a 5x7 card base.
  2. Take the blue white lace floral paper from the Gossamer Blue Pad and trim to 4.5 x 4 3/4 inches.
  3. Take a tan, blue floral scroll paper from the Gossamer Blue Pad and trim to 1.5 x 4 3/4 inches.
  4. Adhere the blue white lace floral paper to the card base.
  5. Take 1 of the paper doilies (an intricate round die cut from white cardstock can be substituted) and adhere to the bottom of blue background paper with only three quarters on the blue paper and the rest can be trimmed off or left (will be hidden).
  6. Have fun choosing the ephemera from the fussy cut pages, such as the floral boquets and choose 3 tickets total for the layering. Once fussy cut images are cut or die cut and tickets add foam tape to the back and layer. 
  7. Layer in a fan style, so that the tickets and ephemera line up along the bottom edge of the blue background paper, but position the bottom pieces a bit lower so that they look like they are coming out of a pocket. Have fun positioning the floral pieces according to your tastes and adhere half of a second doily on top once finished as shown in the picture.
  8. Take the tan floral scroll paper strip, apply mounting tape to the back of it and adhere to the bottom of the card. Apply your chosen sentiment and decorate your card with enamel drops of your choosing. 
  9. Enjoy! 

Make sure to shop the LemonCraft collection at Cherish the Memory! 
Specific links are linked in the materials list.


Wednesday, May 2, 2018

My First Heartfelt Creations Sweet Peony Collection Project for May


Mixed Media "You are my Everything" Peony Canvas

Welcome to my blog!

Thank you for joining me in my first Heartfelt Creations project post for Inspiration Wednesday. I am sharing the details below with you on how I made this flower bordered canvas.


Heartfelt Creations Products Used:

HCDPI-288 Sweet Peony Paper Collection
HCPC-3819 Small Sweet Peony Cling Stamp Set
HCPC-3820 Large Sweet Peony Cling Stamp Set
HCPC-3821 Peony Blossom Stamp
HCD1- Small Sweet Peony Craft Die
HCD1- Large Sweet Peony Craft Die
HCD1- Peony Blossom Die
HCST1-401- Deluxe Flower Shaping Tool Kit


OTHER PRODUCTS
An 8x8 Canvas, White Heavy Gesso, Daubers, ZIG Wink of Stella Glitter Light Green Marker, ZIG Wink of Stella Glitter Green Marker, TCW Bricks Stencil, Memento Inks in colors; Bamboo Leaves, Cottage Ivy, Rose Bud, Lilac Posies, Angel Pink, Rhubarb Stalk; Finnabair Stone Effect Paste in Pumice, Faber-Castell Glass Bead Glitter Gel, Stamp Platform or Acrylic Stamp block, Yellow Seed Beads, Green Floral Wire, Hot Glue Gun or strong adhesive, Mounting Foam Tape, decorative white picket fence, Creative Embellishments decorative border chipboard, Two decorative small twig nests, Four flat backed rhinestone embellishments, Finnabair Acrylic Paint in Metallique Vintage Rose, Brushes for paint and gesso, Palette Knife for Stone effect Texture Paste, wire cutter, Heat tool (Optional)


Instructions:

Preparing the canvas - Prime the reverse side  of the canvas with two coats of White Heavy Gesso, making sure to also prime the inner sides of the wood frame. Once dry, apply Stone Effect Paste or Texture paste of your choice using the Bricks Stencil with a palette knife to create a wall effect. Allow to dry.

Place the 6x6 Heartfelt Creations Paper collection bird and fence scene centered into the canvas and glue into place. I recommend only tucking in one side and positioning before gluing down. Set Aside. Prime the chipboard frame with gesso and paint with Finnabair Acrylic Paint in Metallique Vintage Rose. Adhere the border chipboard to the frame to create a trellis look with strong adhesive or a glue gun and line the decorative white picket fence below it. When lining the decorative fence, place it beneath the fence in the image, so as to not block it and create the look of a second, much closer fence to create depth.

To make the leaves, stamp the leaves from both the Large and Small Sweet Peony die sets in Memento Cottage Ivy and color with Memento Bamboo Leaves with a dauber.. Make a total of 23 leaves, an assortment of both sizes for three large peony flowers and ten small peony flowers. For the small peony flowers, stamp and color green flowers to act as the green stem for each. Once finished, use a dauber to edge the leaves with Memento Cottage Ivy to create contrast. Use both Zig Wink of Stella Glitter markers to accent the veins in each leaf. Set aside.

Using the Deluxe Flower Shaping tool kit, stamp and die cut two Large Sweet Peony flowers from the Large Sweet Peony Cling Stamp Set by stamping them with Memento Rhubarb Stalk. With the dauber, color the flowers with Memento Lilac Posies and color the edges with Memento Rhubarb Stalk. Then, stamp and die cut one Large Sweet Peony using Memento Rose Bud Ink for the stamp and Memento Angel Pink for the dauber to color and edge the flower. Make sure to remember to color the backs of the flowers. Stamp and die cut ten Small Peony flowers in an assortment using the same ink color combinations as the large Peony flowers. Once you have the small Peony flowers assembled and shaped, use the piercing tool to slip the green wire through the centers of the flowers and hot glue, snipping whatever is leftover inside the bud with wire cutters. Make sure to leave a tail of about 5 inches, so that they may be curled later during arrangement. Once all flowers have been assembled, drop a dime sized portion of hot glue into the center of each of the flower buds and quickly sprinkle with yellow seed beads to create the pollen.

Arrange and affix the flowers around the left side of the canvas, aligning them with them along the chipboard frame to create the illusion of the flowers growing up along a trellis. Adhere the leaves to buds and tuck them in and around flowers to create the foliage. To create the curled sprigs, take the bottom of a brush and wrap the tails of wire around the handle and curl as desired and snip with wire cutter. With a brush, add dashes of Faber Castell Glitter Bead Gel to the edges of flower petals and leaves. Add any rhinestone embellishments and twig nests in empty spaces to add detail. Adhere some small Peonys behind the decorative fence along the bottom of the wooden frame to create a connection between the background and the front of the canvas frame. You can have leaves and wire sprigs poking through the fence to add to the dimension.

Stamp and die cut the blossom in the Peony Bud and Blossom stamp set. Use Rhubarb Stalk for the stamp color with Memento Lilac Posies with a dauber and affix to the empty sky space with mounting foam tape. Cut out background graphic and sentiment from the Sweet Peony Paper Collection and do the same to create layers with foam tape. Add any extra leaves or sprigs to your taste. Enjoy!


VIDEO LINKS
For more tips on creating with the Sweet Peony collection, watch the tutorial at https://youtu.be/L9_MLkvpGPQ


Tuesday, March 6, 2018

Lemoncraft's Vintage Time Simple Doily Card with Layers

Simple Vintage Time Card designed for Cherish the Memory
using "Gossamer Blue" Paper Pad


Once in a while, I challenge myself to stick to good old paper and adhesive for the sake of good simple design. Well, maybe with some ribbon and tiny embellishments thrown in ;) 

This card was a quick make, probably spent an hour and a half at the most with the most time consuming part being drooling at the paper choices and figuring out the layout.


Love Nuvo drops by Tonic. They are my go to product for even the simplest of projects. I love that drops can be added to even the most simplest card, and still add that detail I crave!


This little girl was my favorite feature of the collection! I knew that when I used her that I would save her for the simplest project, so that she may be the center of attention. I made sure to center her in the middle of the doily for the focal point on my card.


Flair buttons are fairly new to my crafting arsenal, but already have a hard time seeing myself crafting without them. In this case, it is a perfect embellishment over top of a ribbon bow, making it look as if it is holding the card closed.


The challenge I had with this card, for me because I'm detail oriented, was giving this card depth and dimension without making it a mixed media card, or losing it's simplicity. You can easily layer a simple card by playing with the paper itself, by using a bit of foam tape I created a "booklet" effect by placing strips of the different patterned paper in the paper pad and gave each one a different placement to make it appear as if each strip was essentially a "page" descending from left to the right. The beautiful music sheet really helped me achieve that look. To further accentuate this, I made sure the paper doily was beneath the strips.


See that little heart there? If you look closely, I have scattered and glue down little tiny hearts. They are hearts that were die cut leftovers punched out from a Spellbinders die I used for the blue rose doily behind the little vintage girl. 


Thank you for checking out my blog post on this simple card! These gorgeous Lemoncraft papers and flair button can be purchased at Cherish the Memory. Links below!


Thursday, February 8, 2018

Mixed Media Butterfly Canvas for Cherish the Memory


Lemoncraft Vintage Time Mixed Media Canvas

"Great things take Time"


Hello! I am excited to bring you my first post of the new year! It has been a short while since I have last felt like I really "created" anything, so you can say I was more than ready to make this mixed media canvas!

This is my first time working with Lemoncraft papers, which are beautiful Polish papers that you can get from Cherish the Memory Etsy store. The links to the products will be at the end of this post!


The overall layout of the canvas is a rather busy one, so I wanted to make sure that the background stayed light and subtle, so as to not be distracting and remain a background all the while containing just enough color to tie the background with elements of the face of the canvas. 

For the background I used : 

Tim Holtz Stencil
Finnabair Mini Art Stones
Finnabair  Patina Effect Mint-Green Paste
Finnabair Acrylic Paint in Opal Magic "Blue-Gold"
For the splatter effect : Tim Holtz Distress Spray Stain in "Black Soot"


My favorite part of the canvas is this elegant chipboard piece by Creative Embellishments. I used heavy black gesso to give it that beautiful black matte effect. These lovely butterflies were fussy cut from Lemoncraft fussy cut papers which are listed below.


I love Tim Holtz Idea-ology stickers! They are perfect for all mixed media projects, so I love using them in mine. I especially love that they come in black and white, so this black sentiment was perfect for creating the contrast I needed for the black accents in the layout.


I mainly drew inspiration from this lovely flair button for my canvas! I love contrast, and I wanted to marry the black and white beauty of the wings along with the soft warmer browns and creams into the color palette for that vintage look that these papers are styled after.


I used organic fibers to help give dimension to the center frame/piece of the canvas. The chipboard frame received the same treatment as the elegant scroll chipboard, to make the center piece pop and to play along with the black in the pansies. I loved the garden effect the paper flowers and paper leaves had! It made the canvas seem as though it was "sprouting" which is always a good thing, considering I am as far from having a green thumb as possible! :) 


I took a chance on using white crackle paste and white acrylic paint to give this chipboard piece an aged shabby look. I wanted it to look as though time had passed and the "wildlife" had essentially taken over, and luckily I ended up loving it! You MUST take chances.


Love dimension! The more the better! What I love even more are rhinestone embellishments. I love all things sparkly, and they are excellent at creating depth by reflecting light amongst the back layers.


I hope you have enjoyed my post! We are into February now, but I hope you have had a great start to the year already. 


Eugenia Redmond


https://www.etsy.com/listing/589290965/lemoncraft-vintage-time-007-a4?ref=shop_home_active_13


 Fussy Cutting Sheet A4

https://www.etsy.com/listing/573160712/lemoncraft-gossamer-blue-button-and?ref=shop_home_active_13

    https://www.etsy.com/listing/586968773/lemoncraft-6-x-6-gossamer-blue-card?ref=shop_home_active_11

"Wrapped in Adventure" Layered Card for Cherish the Memory

Layers and Distressing  Using Studio Light's Paper Collection "Memories of Summer" Creating Layers Do you ever ...