Friday, June 29, 2018

"This is all I need" Mixed Media Canvas


A Bright, Deliciously Pink Mixed Media Canvas
for Cherish the Memory 


Hello all! Welcome to my blog!

Today I will be sharing with you this mixed media canvas I have created for Cherish the Memory using Studio Light ephemera available at the shop.

I will start out by saying that out of all the hobbies I have, I love love love making canvases the most! This canvas has taught me that you don't need a lot of paper to create a work of art, just some beautiful ephemera! I will be listing below links to this gorgeous ephemera at the end of the post.


Being Resourceful

A must in my canvases is texture, the more the better! Experimenting with the combination of textures, whether it is a lot of different textures combined together, balanced, one simple texture, I believe there is no right or wrong. For example, in the background of the canvas I used two different stencils with modeling paste, in addition to art stones, and microbeads!

If you notice, the shapes of textures doesn't stop there, I bring the texture over in layers by adding a layer of mesh and twine. I think it is important to tie the elements in the different layers to each other, so that they all sort of have this relationship and they marry into one another. I like to be cohesive. Speaking being resourceful, can you guess what that mesh is? It isn't store bought, it is mesh that I have repurposed from a laundry bag that was getting tossed out cut up into pieces.


Here you can see the various layers creating dimension. The first layer is texture using stencils and modeling paste. The second layer is paper flowers with recycled mesh and twine. Third layer presents the ephemera. 


To create depth, you can see that I strategically place rhinestones in areas that need interest, like crevices, dark spots that need some light to reflect back to the viewer. I do this last!


I hope you have something to take away from my post and thank you for visiting! Here are the links to the ephemera used in my canvas.

This and more from Studio Light's Memories of Summer available at Cherish the Memory


Friday, June 22, 2018

Adventures in Travel Card for Cherish the Memory

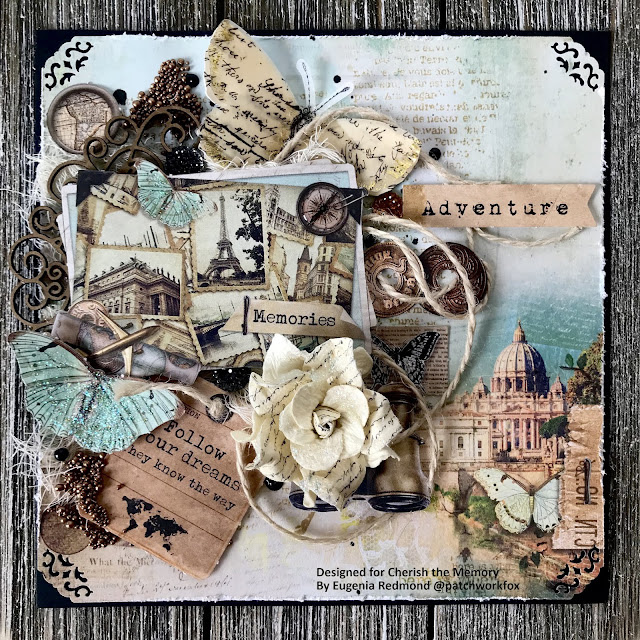
"Adventure" Mixed Media Card using "Memories of Summer" Studio Light Paper Collection


It's that time of year where everyone is happy that it's Summer because they are either going on vacation or they're simply happy that school it out! Whatever people choose to do, it's usually a given that most people relax and have fun. This card illustrates the wonder of travel by using Studio Light's "Memories of Summer" Collection available at Cherish the Memory store

Below are image links to the Studio Light products I have used to create this card :


How to make this card


As you can see, this collection is a pre-cut treasure trove of ephemera, which really makes cards using Studio Light paper really easy! I like to however, convert anything I can into mixed media so I used a combination of different styles of texture embellishments.


For the materials and embellishments I used :

Ranger Glossy Accents
Mini Prills by USArtQuest
Rhinestones
Faber Castell Glitter Glass 
Jute Twine
Cheesecloth
Nuvo Crystal Drops in Ebony
Prima Marketing Paper Flower
Recollections by Michael's Butterfly
Ranger Archival Ink in Tree Branch
BoBunny Text Stamp
Fiskars Corner Punch in Romantique
Prima Marketing Paper Distress Tool
Black Cardstock


Steps:

1. Create a 6x6 card using black cardstock. Take your paper of choice from the "Summer Memories" Paper pad, distress the edges and corner punch as desired and adhere.
2. Stamp the background using your favorite text stamp and your preferred ink color, making sure it matches the overall color theme of your card.
3. On the left side of the card or wherever your focus will be, use adhere down cheesecloth as the base of your embellishments and ephemera.
4. Adhere with a strong adhesive your chipboard and use it as a frame so as to guide your layering choices with the ephemera you are to use.
5. After adhering the major paper ephemera pieces, choose the locations of your bigger embellishments such as any paper flowers or butterflies.
6. Adhere twine or string of choice to create a tie between the ephemera and the background of  the card.
7. Adhere down your rhinestones. I like to use rhinestones in dark corners to add a pop of interest and brightness.
8. After you are content with the placement of everything you can add the wet embellishments that need to dry.
9. Let card dry and enjoy!


Thank you so much for visiting my blog! I hope you have enjoyed the mini tutorial!


"Wrapped in Adventure" Layered Card for Cherish the Memory

Layers and Distressing  Using Studio Light's Paper Collection "Memories of Summer" Creating Layers Do you ever ...