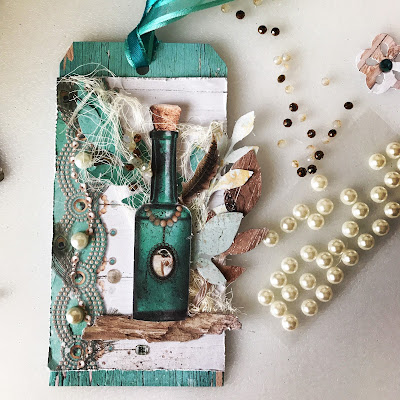
A Mixed Media Tag Tutorial
This tag is made from Cherish the Memory's Studio Light "Summer Feelings" Deluxe Craft Kit
Here are the items I used from Cherish the Memory's Etsy store to create this tag! Click on the image to be directed to the listing.
Tutorial
You will need:
Foam Tape
Double sided tape or glue of your choice
Transparent Gel Medium
Scissors
Paper Distress Tool (Optional, Scissors can be used as well)
Mesh or Cheesecloth
Decorative Beads
Flat backed Gems or Rhinestone Embellishments
Glue Gun
Take a large tag and trace the tag on your desired background choice using the Summer Feelings Paper Pad. The Paper Pad is full of background choices, this aged wooden teal background is gorgeous, and was the premise of the color choices for this tag.
This pearl design paper can be found in the Paper Pad as well and is cut down to expose the background paper. The key to a dimensional tag is layering, so to achieve this, I chose a 2nd layer that would contrast the background layer (while leaving space for the ribbon hole) and serve as a neutral background for our die cuts.
Punch out your desired die cuts (link listed above) and play around with your focal point. I personally like to go for the foliage first, to create a natural background and tie in the mesh/cheesecloth. Here you can see that I chose to build a focal point on the right side of the tag to balance out the beautifully printed image on the left side.
Take your glue gun and place dots where you would like the mesh to spread about after you have decided where to place the die cuts.
Feel free to play around with layering the die cuts before gluing any of the major elements down. This is usually the most time consuming aspect of the project for me, so make sure to take your time! I love moving things around and exploring different positions until I am satisfied with the balance of the overall design. It is helpful to remember your main focal point, so that the eye of the viewer is guided throughout the precious elements.
At this stage, have your layout determined and start playing with any embellishments you have chosen to use. Embellishments can be just as important as the paper elements in creating depth. I love to hide embellishments underneath the die cuts so that they can "peek" through the layers to add an interesting dynamic so that the longer you look at the tag, the more you may discover!
I decided to use flat backed pearl embellishments to go along with the pearls in the paper so that the dimensional elements can tie into the background.
Choose your beaded elements and start gluing them as you go with gluing your paper die cut elements. I like to use the mesh/cheesecloth to sort of nestle the beads into while using my glue gun.
I used a Tim Holtz chat sticker to label my tag towards the bottom (optional).
This mixed media tag was a delight to create. All it really takes is some extra elements, layering and having a theme/matching kit to pull it all together makes this tag look complex, while it really isn't.
I hope you enjoyed my tutorial! Please check out my close ups below to see more details.
My tag is available for purchase on my Etsy store! Purchase here


No comments:
Post a Comment