
Hello all!
I am excited to share my first project designed for Cherish the Memory as their design team member! In this post I will be showcasing a step by step photo tutorial using Cherish the Memory's "Romantic Summer 3D DIY Kit to make a dimensional decorative wall hang using a wooden frame. You can purchase the kit here : Romantic 3D Card Kit

Supplies Used:
- Wooden Frame, A Wooden Shallow Box or the back of a canvas
- Finnabair White Crackle Paste, Gesso or a heavy body white acrylic paint
- Seashells and rocks for the ocean floor portion
- Raffia for the seaweed that can be purchased here : Raffia
- 3D Romantic Summer Card Kit (highly recommended for this project) or any beach themed paper collection with an assortment of sea and beach life graphics
- Finnabair Art Stones and Mini Art Stones for Texture
- Cheesecloth for ocean mesh
- Finnabair Art Alchemy Acrylic Paint in Blue-Gold, Aqua Rose and Light Patina for the background highlights
- Lindys Stamp Gang in Time Travel Teal for background
- Basic Crafting Supplies : Glue Gun, Paint Brush(es), Scissors and a Craft Mat to protect your space.


Tutorial

I decided to use the back of a wooden palette type frame that I found in the woodcrafting section of my local craft stores for about $6. You don't have to stick with wood and can use the back of a canvas but the depth won't be as great and the results may differ a tiny bit because of the nature of the surface.

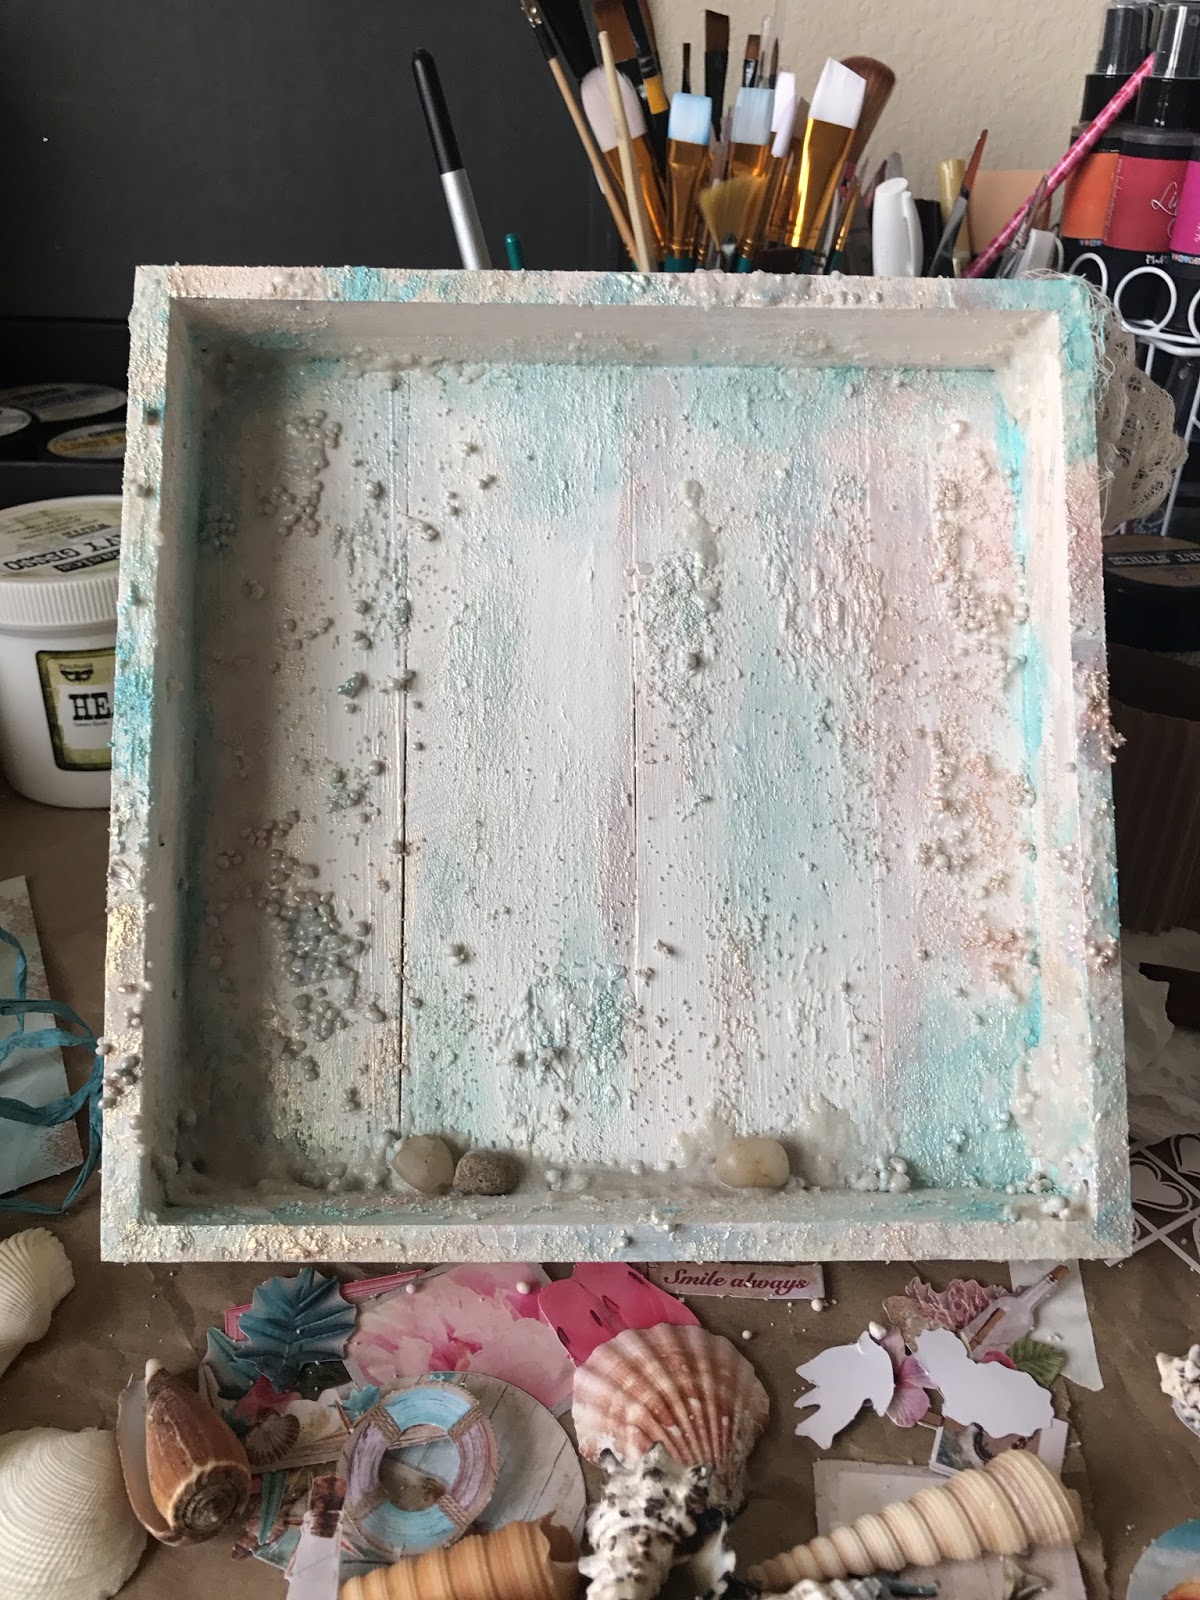
A very light coat of gesso was painted on just enough to prime the surface. This is entirely up to you, I did so to have some of the grain show through.

Here is where I applied some white crackle paste by Finnabair so that the surface would take on an aged look and look as if the paint had started chipping off from years of moisture. You can apply more gesso or use the crackle paste to adhere the Finnabair Art Stones or whatever you choose to use for texture. My goal here was to make the little balls look like barnacles had started attaching to the wood from years of being by the ocean.

I started applying the acrylic paints to highlight the texture of both the stones and the crackled effect after everything had been dried.

A close up of the texture


Hello all!

Supplies Used:
- Wooden Frame, A Wooden Shallow Box or the back of a canvas
- Finnabair White Crackle Paste, Gesso or a heavy body white acrylic paint
- Seashells and rocks for the ocean floor portion
- Raffia for the seaweed that can be purchased here : Raffia
- 3D Romantic Summer Card Kit (highly recommended for this project) or any beach themed paper collection with an assortment of sea and beach life graphics
- Finnabair Art Stones and Mini Art Stones for Texture
- Cheesecloth for ocean mesh
- Finnabair Art Alchemy Acrylic Paint in Blue-Gold, Aqua Rose and Light Patina for the background highlights
- Lindys Stamp Gang in Time Travel Teal for background
- Basic Crafting Supplies : Glue Gun, Paint Brush(es), Scissors and a Craft Mat to protect your space.

Tutorial


The Raffia and Seashells
The bright blue color here was the last addition in terms of the paint process. I used Lindy's Stamp Gang Spray in "Time Travel Teal". It brought contrast and tied the colors to the Raffia I used from Cherish the Memory. I was very pleased using the raffia because it made a perfect "seaweed". You can achieve this look by taking your glue gun and adhering the ends of a looped handful of Raffia, then cutting the looped part at the top so that the ends are even and tucking them behind and under the seashells. I glue the seashells first and then applied raffia in the corners and any crevices I found but you can apply the Raffia beforehand, just make sure to cover the bases with shells or any other decorative items you may think of using.
Using the "Romantic Summer DIY Card Kit"
I cannot express how fun this part was! The kit is so rich with lively colors and beautiful ocean themes that despite my love for painting and altering I must say this was my favorite part. The sky is the limit with this card kit because it was so generous in terms of the different designs, very well worth the price. The kit is perfect for those that love attention to detail like myself!
Here are some close ups of the project:


After completing the project I truly felt like I had just been at the beach. Making projects like these brings me back a flood of memories from past family vacations to the ocean with my parents.
I hope you enjoyed this tutorial! Be sure to check out Cherish the Memory on ETSY (link below) and thank you so much for stopping by!
Links
Website : http://www.cherishthememory.co.uk/


So gorgeous, Eugenia! And great tutorial...makes it so much less intimidating to try and dive into a project that looks this intimidating to see it step by step. Appreciate the time you've put into this, and thanks for sharing your talent. Amazing work!
ReplyDeleteCarrie :)
dearzae.com
I'm so happy you liked my tutorial! It means SO much to me since this was my very first design blog post as well as my first tutorial. Thank you for your sweet and lovely words Carrie <3
Delete